Return to Networkable Mac Games homepage
One question I often get (particularly with the release of many newer games that support TCP only) is how to set up a TCP/IP connection directly between two computers over modems. This page shows you how.
The advantage of establishing a direct PPP (i.e. TCP/IP) connection is that it is often the fastest way to communicate because TCP datagram packet can be larger than typical modem or Appletalk packets. You do not experience the lag normally associated with the Internet. This is the fastest way to play Quake; it is even faster than even Quake's internal modem support.
Once the PPP connection is established, you can run any software you normally would over the Internet, including Hotline for exchanging files and chat (perfect for between game chats), FTP with Netpresenz, etc.
These instructions assume that you have OT/PPP installed. Go to the OT/PPP page for instructions to install that software.
Create a new modem script
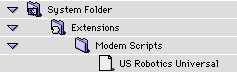
- Locate your current modem script. Modem scripts are located in the folder "System folder:Extensions:Modem Scripts". You can see which script you're using by looking in the Modem control panel, in the "Modem:" menu.
- Make a copy of your modem script (from the 'File' menu, select 'Duplicate'). Rename your new modem script by appending the words "direct connect" to it, for example:
US Robotics - Direct Connect
- Open your modem script with a text editor such as BBEdit. The script is in plain text, and BBEdit is argueably one of the best text editors available (as a matter of fact, I use BBEdit Pro to create these pages). You can download the freeware "lite" version from Bare Bones ftp site:
 Download BBEdit Lite 4.1 (772k)
- Find the line reading (use the "find" feature (Cmd-f) of BBEdit to find this quickly):
ifAnswer 32
- Replace it (I suggest copying & pasting) with the following lines:
!Put the modem in auto-answer mode
note "Waiting for call..." 2
write "ATS0=1\13"
jump 32
- Save your modified script
Create a new Modem control panel configuration:
- Select the "Configurations" menu item (cmd-K)
Go to the OT/PPP: Configurations section of Installing OT/PPP for a detailed explaination (with screenshots) of how to do this.
- Duplicate the default configuration, and name it something like "Direct Connect Host"
- Make the configuration active
- Change the modem script selected to the new script you just created
- Close the control panel and save changes
Create a TCP/IP control panel configuration:
- Select the "Configurations" menu item (cmd-K)
The OT/PPP: Configurations section offers a very similar detailed explaination (with screenshots) how to do this.
- Duplicate the default configuration, and name it the same as the Modem configuration
- Make the configuration active
- Make sure "Connect via:" is set to "PPP"
- Change the "Configure:" menu to "Manually"
- Change the IP address to 192.1.1.2
Concievably you can put any number in here as long as it's unique, but Internet standards and conventions has designated the 192 subnet for "private" networks. I suggest following this rule just in case something "bad" were to happen, such as forgetting to reset your configuration when reconnecting to the Internet.
- Make sure all other fields are blank
- Close the control panel and save changes
Create a PPP control panel configuration:
- Select the "Configurations" menu item (cmd-K)
Again, the OT/PPP: Configurations section offers a detailed explaination (with screenshots) how to do this.
- Duplicate the default configuration, and name it the same as the Modem configuration
- Make the configuration active
- Set the connection to "Guest"
- Leave the "Number" field blank
- Click the "Options" button and then the "Protocol" tab; and uncheck "Allow error correction and compression in modem".
Never uncheck "Use TCP header compression" as the advantages of this feature far outweigh the the few extra CPU cycles it consumes. This is explained in fuller detail by an Apple Netsprocket engineer on the OT/PPP: Protocol Options page.
- Close the control panel and save changes
This may vary depending on your client. For example, it may even be possible to have a Windows 95 user connect. But, assuming that the client will be another Mac OT/PPP user, here's how it would be set up:
Create a TCP/IP control panel configuration
- Select the "Configurations" menu item (cmd-K)
The OT/PPP: Configurations section offers a very similar detailed explaination (with screenshots) how to do this.
- Duplicate the default configuration, and name it something like
"Direct Connect Guest"
- Make the configuration active
- Make sure "Connect via:" is set to "PPP"
- Change the "Configure:" menu to "Manually"
- Change the IP address to 192.1.1.3 (or any other address as long as it's different from the host's address)
- Make sure all other fields are blank
- Close the control panel and save changes
Create a PPP control panel configuration
- Select the "Configurations" menu item (cmd-K)
The OT/PPP: Configurations section offers a detailed explaination (with screenshots) how to do this.
- Duplicate the default configuration, and name it the same name as the TCP setting (like "Direct Connect Guest").
- Make the configuration active.
- Set the connection to "Guest".
- Leave the "Number" field blank.
- Click the "Options" button and then the "Protocol" tab; and uncheck "Allow error correction and compression in modem".
Never uncheck "Use TCP header compression" as the advantages of this feature far outweigh the the few extra CPU cycles it consumes. This is explained in fuller detail by an Apple Netsprocket engineer on the OT/PPP: Protocol Options page.
- Close the control panel and save changes.
|
Part 3: Preparing for a connection
|
Select the new configurations for all three control panels on both machines, now the hardest part is coordinating when to initiate the calling and answering... ;-)
- The Host Machine:
- Click on "Connect" - your PPP panel should read "Waiting for call..."
- The Client Machine:
- Click on "Connect" - your modem will dial and the host should answer
Voila! You should have a PPP connection...
Note that there is a short (about 1.5 minute I think) timeout on the answering modem side. If the connection is not established within that time, you will have to click "Connect" and try again.
|
AppleScripting Your Configurations
|
Switching configurations for three configurations can obviously get to be a little tedious after doing this more than a couple times. Fortunately, there is a scripting addition that'll make all that pain go away.
The first thing to do is download the software and drop it into the 'Scripting Additions' folder inside your System Folder (you don't need to restart):
OTConfigs 2.0
Once installed, it's very easy to create an Applescript to change all three configurations at once. OTConfig comes with example Applescripts and easy instructions so that even beginners can do it.
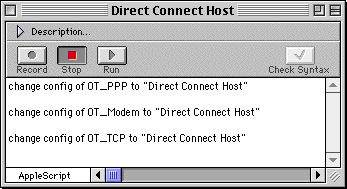
In the OTConfigs "Sample Scripts" folder, open the "Sample 2 - PPP" file (double-clicking should open the Script Editor that's installed with MacOS 8 and System 7). Edit the script so that it reflects the names of the configurations you created above
Select 'Save As...' from the file menu: 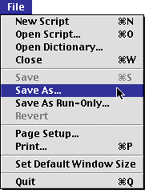
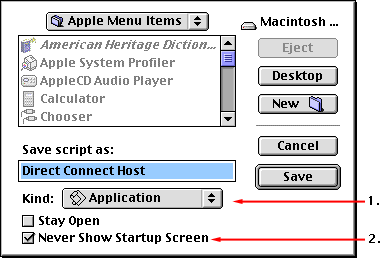
- Click this pop-up menu and select "Application".
- Check "Never Show Startup Screen", otherwise you'll get dialog box everytime you select it telling you this is an AppleScript, blah, blah, blah...
Don't forget to create another Applescript applet to switch it back to your original configuration!!!
I use Applescripts extensively to automatically dial, disconnect, switch configurations, and more. I've created an alias in my Apple Menu where I keep my PPP Applescripts and simply select the one I want. It's quite a shortcut!
The OTConfigs homepage. OTConfig is shareware, please register if you decide to use it.
This page would not have been possible without the help and contributions from Serge Meynard and his willing Quake victim Robert Laflamme, who detailed many of the specifics and procedures. We are all indebted to them!
© Copyright 1998 Rick VanDerveer
Return to Networkable Mac Games homepage